Use APKPure App
Get ゴルフ残距離測定アプリ old version APK for Android
An app that allows you to enter the latitude and longitude of the golf course green yourself, measure GPS with your smartphone (without background operation), and display the distance between that point and the green.
Golf remaining distance measurement app operation explanation (app name GolfGpsGr) version 5
(In version 5, it has been removed from the background for security reasons.)
● 1. Contents of the app
・ This app measures the distance between two points based on the GPS value of the measurement point and the latitude and longitude of the hole green center of the golf course that has already been registered.
● 2, procedure
-Measure and enter the latitude and longitude of the center of the green (may be in front) using Google Maps or Google Earth. (Check the layout of each golf course for bent and korai. Enter the two greens with the left side as a bent.)
・ Basically, you can go back with the ◁ button at the bottom.
・ Because this app uses GPS, please use it outside the house. Also, it may take a minute or two to display the correct value.
・ 10 courses can be registered (both bent and korai).
● 3, screen explanation
〇 ① Screen (first screen, displayed with a number with 〇 in the upper left of the screen)
(1), Data initialization (first time input) button
・ Press this when entering the data (course name and green latitude and longitude data) for the first time. (All course names will be erased at the same time. Latitude and longitude data will not be erased.)
(2), next button
-Press when the initialization has already been completed for the second and subsequent times.
〇 ② screen
(1), new registration and re-registration of course name
・ Press the button to enter a new course name or change the entered course name.
(2), data registration
・ If you have already entered the course name and do not want to change the course name, press this button.
(3) Calling the course name
・ If you have already entered the latitude and longitude and want to call the course name and measure it, press the button.
〇 ③ screen
(1) Register the course name (for example, Otaki Southeast, within 6 characters)
・ Enter the course name above the underlined red line that is blinking on the left side. (If you touch the red line, the input board will appear from the bottom, so use it to enter the course name), and then press the registration button to the right of it.
・ If the character already entered is on the right side of the input field, change it in the input field on the left side to change it.
・ If you do not change the course name and enter from here, the course name will disappear unless you enter the course name again. Therefore, if you do not want to enter this screen and change the course name, press the button to return to ⑥ at the top.
(2), button to return to ⑥
·As mentioned above.
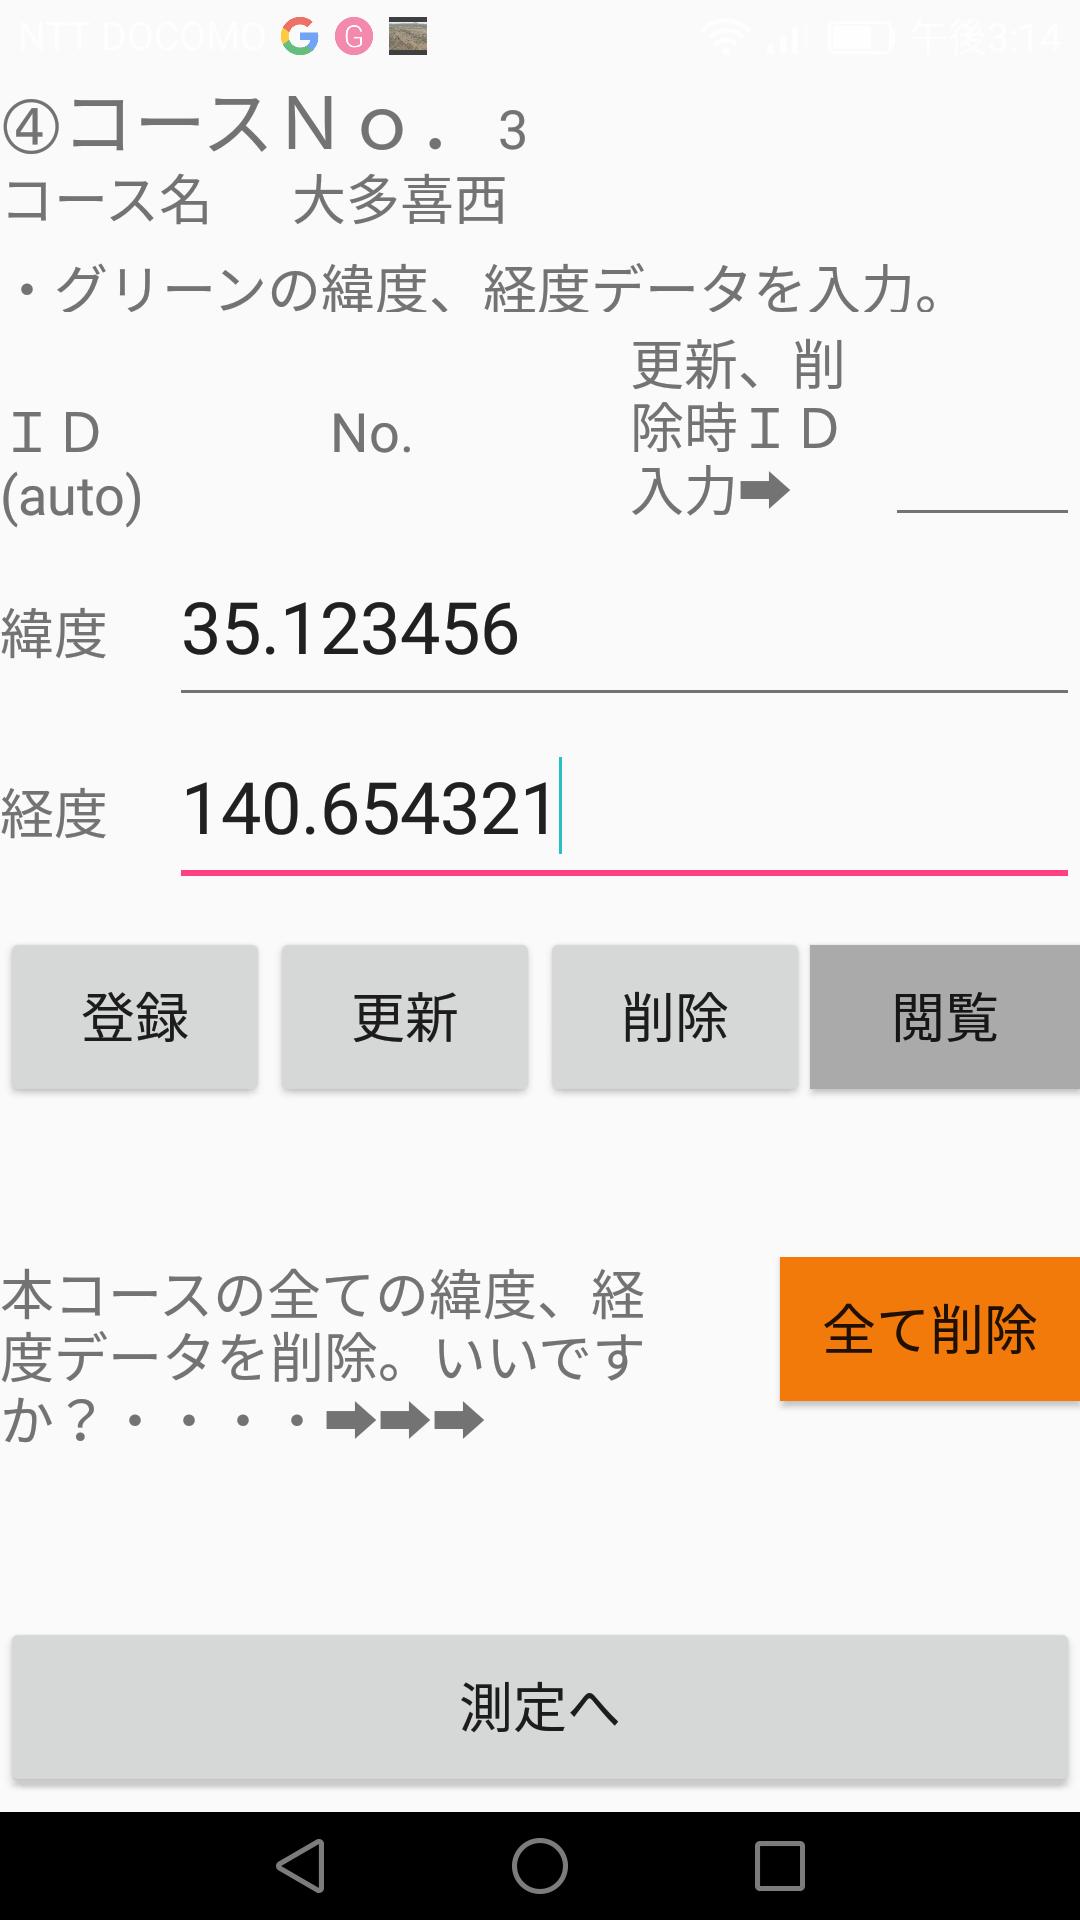
〇 ④ screen
(1), enter the latitude and longitude of the course's green center
・ Course No. , Course name, ID, No. Is automatically displayed. (ID and No. are displayed after entering latitude and longitude.)
-ID is a continuous number (when deleted, the ID disappears, so make a list of latitude and longitude so as not to delete it and enter it while checking), No. Is a number from 1 to 18 as a hole (do not delete as much as possible because it will come around if deleted).
-If the order is not out of order even if deleted (5 is treated as the third and 7 is treated as the fourth even if the IDs are 1, 2, 5, and 7), the distance can be measured correctly. If the order is out of order, the distance will be different, so update from a different place or delete the entire hole with the delete all button (even if you delete all, only 36 data).
・ For the latitude and longitude of the green center of the course, measure the latitude and longitude separately for bent and korai using Google Maps, Google Earth, and the layout of the course to be captured. (Latitude and longitude are not the number of minutes and seconds, but the number with a decimal point.)
(Example: 35.123456 (degrees), 140.234567 (degrees) degrees are not entered, only numbers)
・ First, enter the latitude and longitude of the green center on the 1st hole of the bent course and press the registration button. Then enter numbers 2 and 3, and enter up to number 18. After that, enter the Korai course in the same way.
・ For 2 greens of bent, enter the left green as a vent and the right green as a korai.
-To correct, enter the ID in the rightmost input field in the ID (auto) field, enter the correct latitude and longitude, and then press the update button.
-To delete, enter the ID in the rightmost input field of the ID (auto) field and then press the delete button. (If you press delete, the ID will disappear and the hole No. will be out of order, so be careful when entering. The numbers of ID and No. may be in order even if there is a gap.
・ Press the browse button from time to time to check that the entered value has been entered correctly.
-The delete all button is used to delete the data of all holes (36 points) of the course on the input screen. Once you are prompted to cancel or delete, reselect either one.
・ Press the measurement button when moving to measurement after input.
〇 ⑤ screen
(1) Display a list with latitude and longitude entered.
-Since it scrolls, touch it to push it up and down.
・ To go back, press the ◁ button.
〇 ⑥ screen
Move to the screens (1) and ④ (data registration screen).
・ Similar to ③ screen, but if you press the registration button on the right on this screen, you will move to ④ screen without changing the course name.
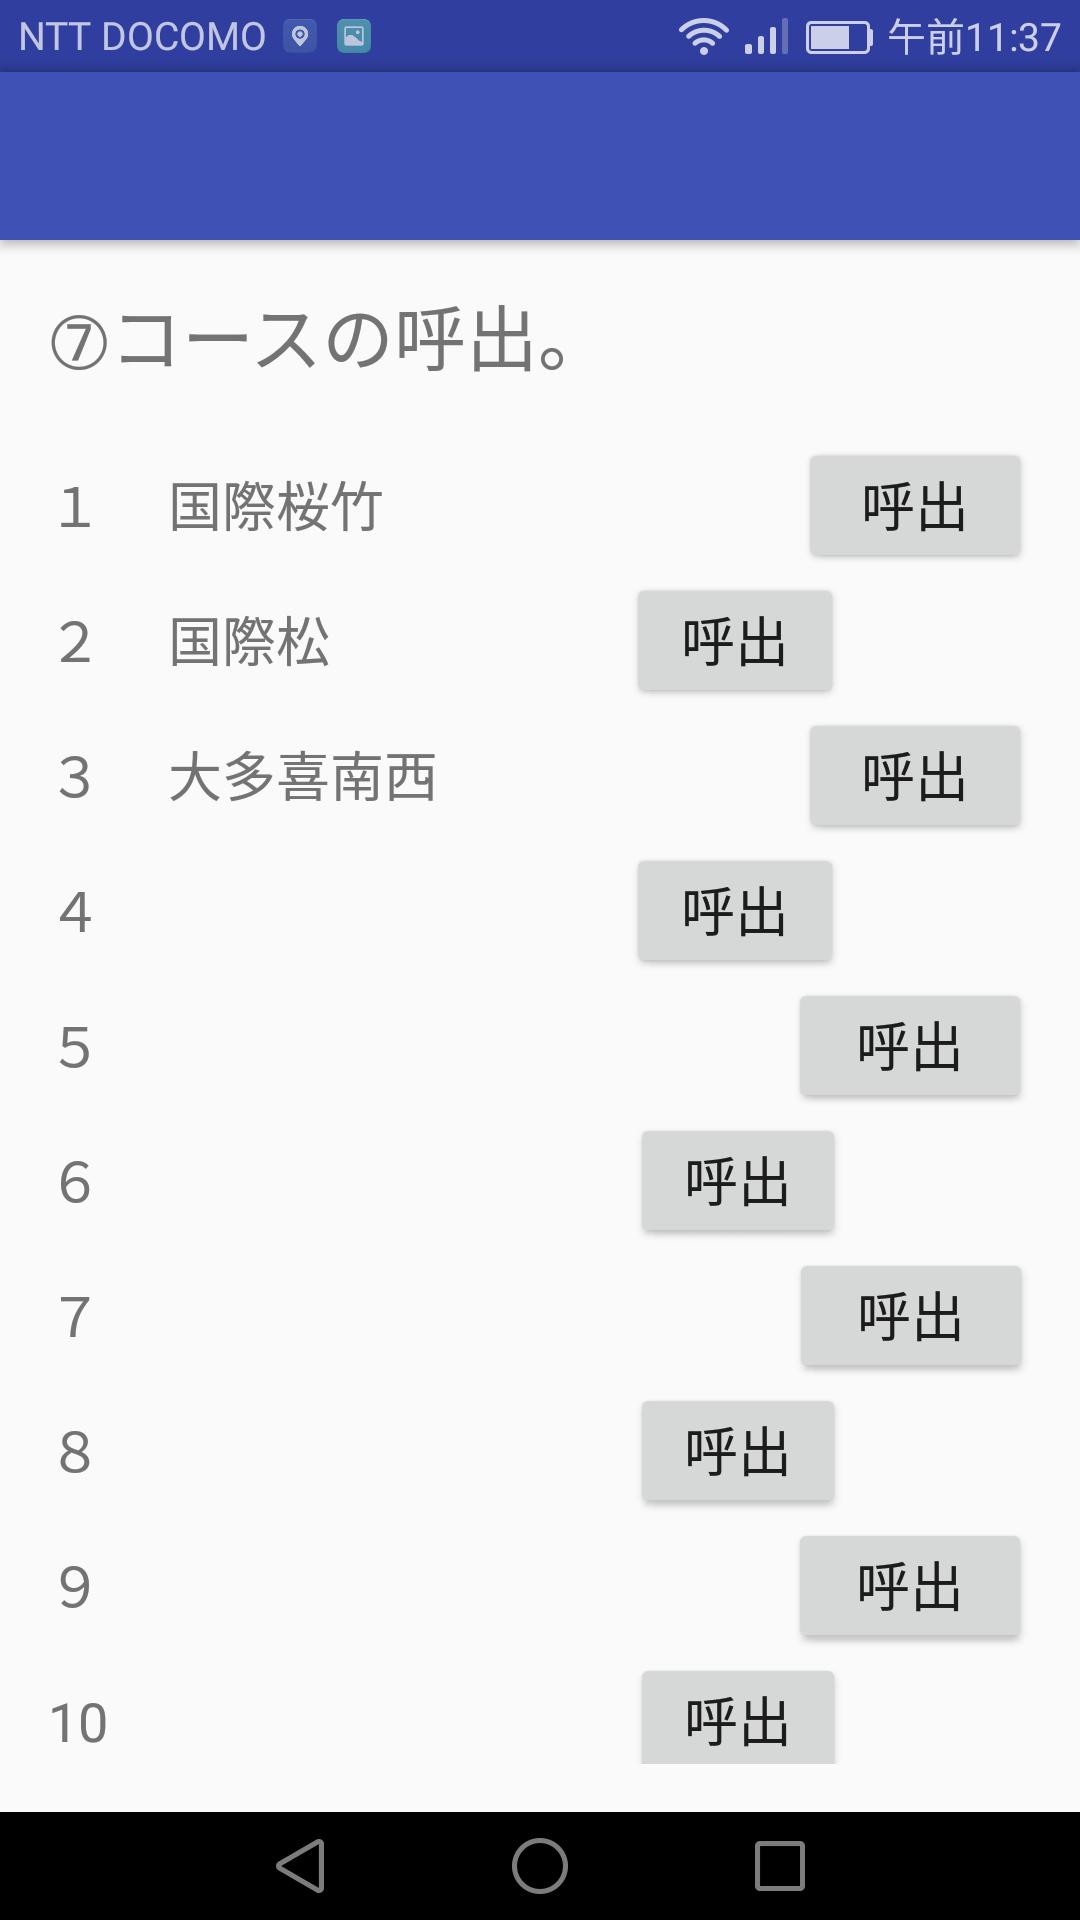
〇 ⑦ screen
(1) Calling the course
・ Since the registered course name is displayed, select the required course from it and press the button on the right.
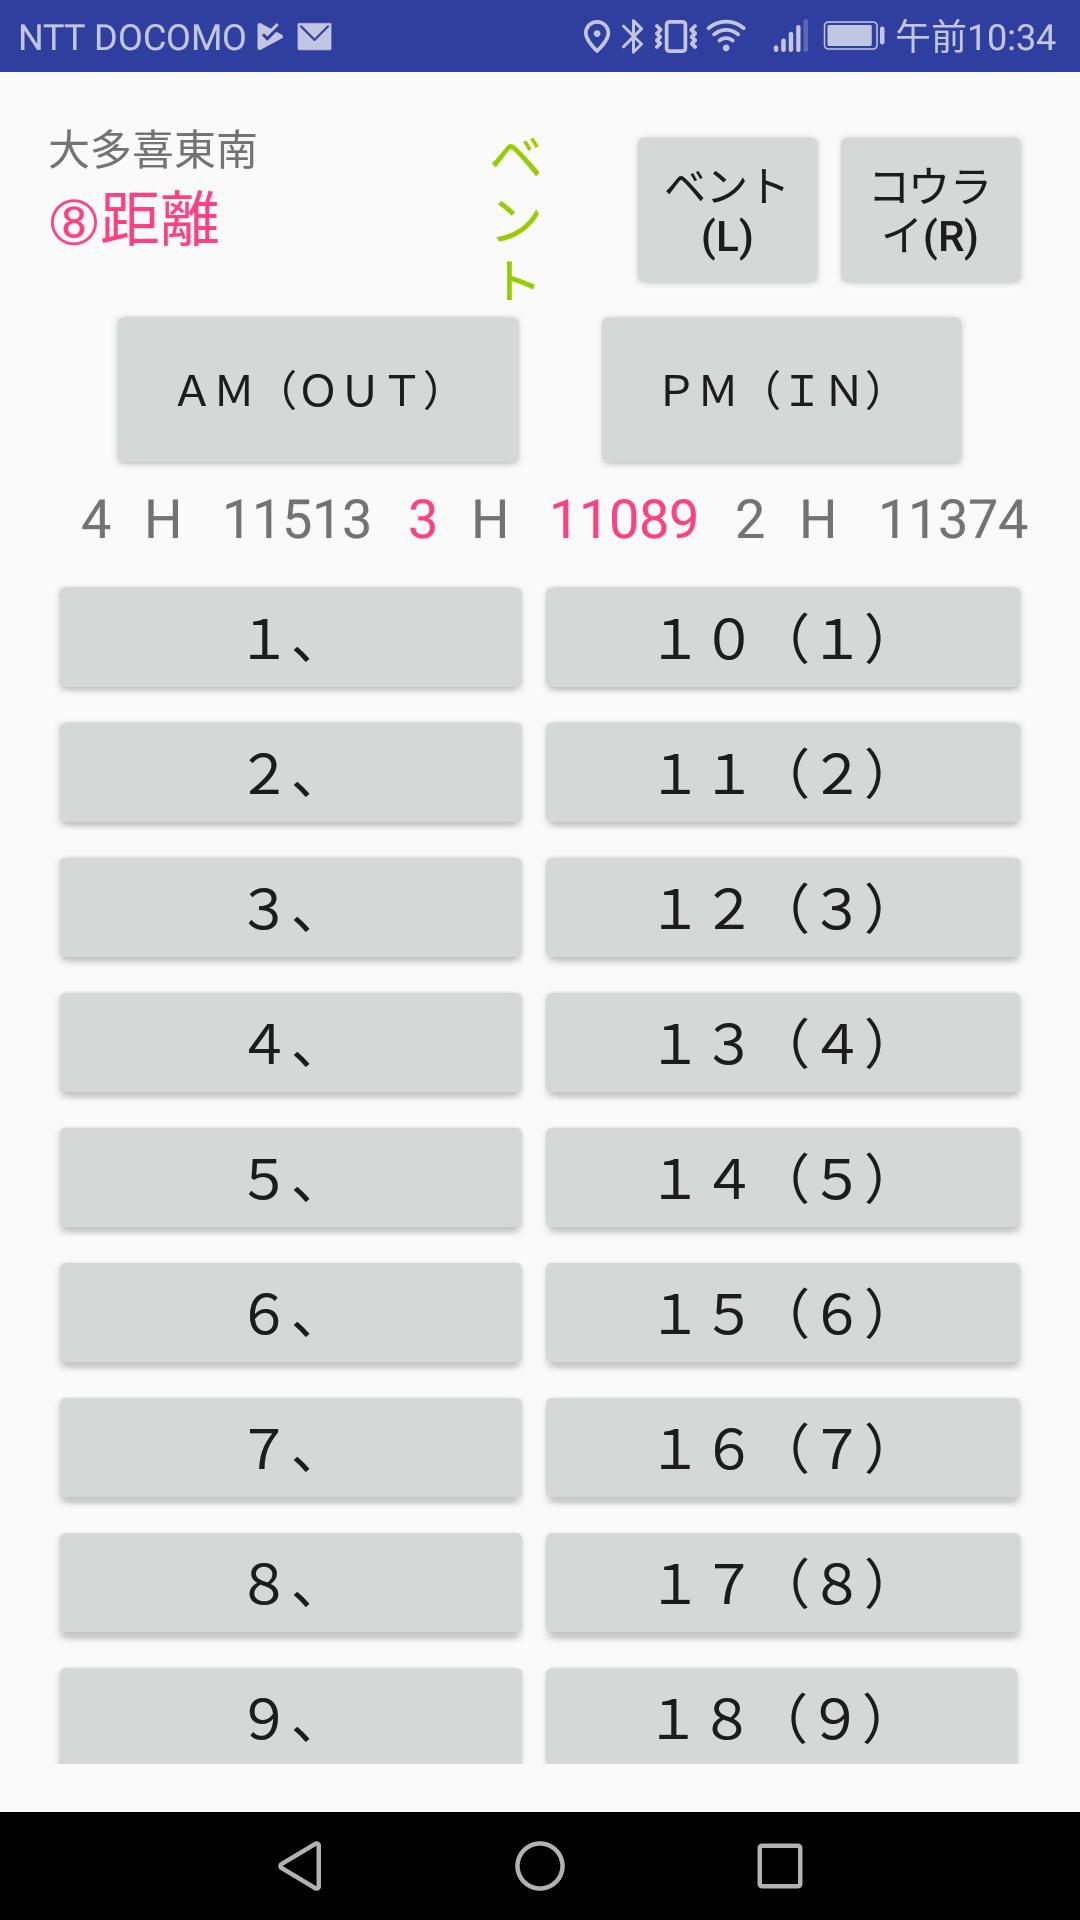
〇 ⑧ screen
(1), result display and turf type input, AM (OUT) or PM (IN) button, or hole number input
-Result distance display to the green (in red at the top) and turf type (enter the bent (left green when bent 2 green) or Korai (right green when bent 2 green) button) button and AM ( Press the OUT) or PM (IN) button, or enter the hole number.
・ Press the turf type button (Bent or Korai).
・ Next, when you press the AM (OUT) or PM (IN) button, the hole number to the nearest green and the distance will be displayed in red in the middle. And first, the next hole number and the distance are displayed in black and white. Finally, the previous hole number and distance are displayed. (For this reason, when starting measurement on the tee ground of a short hole, the distance to the previous green is displayed in red, and the distance to the short hole is displayed first.)
・ When the distance to a strange hole is displayed, press the hole number button (however, when vent 2 green, press each left and right), and green from that location (green center if latitude / longitude input is green center) Display the distance to.
・ As I wrote at the beginning, it may take a minute or two to measure outdoors only for the first time. Also, once the screen disappears, it seems necessary to press the hall button twice due to GPS.
・ The course name is displayed in the upper left.
Last updated on Jun 7, 2018
現在地に一番近いグリーンまでの距離を測定できるボタンを作成したため、ホール番号を入力しなくても距離が測定できる。
Latest Version
![]() 4.0
4.0
Uploaded by
William Pereira
Requires Android
Android 6.0+
Available on
![]()
Category
Report
Discover what you want easier, faster and safer.

ゴルフ残距離測定アプリ
4.0 by ahmountain
Jun 7, 2018